Pages


Saturday, August 31, 2013

Heirloom Tomatoes and Melrose Peppers


It's Harvest Time!


I've been waiting for months to sink my teeth into this summer favorite fresh from the garden. THIS is the reason I patiently grow my heirloom tomatoes. NOTHING can compare to the taste and texture of these meaty, flavorful treasures. Of course, they seem to take forever. Mine grow very tall (7 ft.) and produce about 7-10 tomatoes. But, I grow mine in pots (large pots) so perhaps that is affecting the growth habit. This particular variety is called MORTGAGE BUSTER. Excellent. My all time favorite is MR. STRIPEY. Both varieties are full of sweet flavor and slice up beautifully. The texture is firm, solid and never, ever goopy like grocery store tomatoes.
For this tasty treat I sliced a bagel into three thin slices. Butter, a little garlic powder...pop it under the broiler. Once toasty brown I add a slice of tomato heaven and a slice of mozzarella and put it back under the broiler for a few seconds to melt the mozzarella just a bit. Finally, I top it with fresh basil (grown in a pot right next to the tomatoes, of course) and a sprinkle of balsamic vinaigrette. Have I died and gone to heaven?
Melrose Peppers
Well if all that tomato heaven wasn't enough I now have a new favorite pepper growing in my garden. Remember, my vegetable garden is grown in large pots, so I usually choose varieties that I think will do well in pots. I had read a lot about these Italian favorites and was excited to share them with my pepper-loving Italian hubby. I had no idea they would be so PROLIFIC, CAREFREE and DELICIOUS. I have probably harvested about a dozen 4" peppers from each plant and they just keep going and going.....They can be eaten green or red. They can be stuffed, sauteed or used in salads. They are SO MUCH BETTER than regular sweet peppers. Why doesn't everybody grow these? Probably because, like me, they never heard of them...till now. By all means, get yourself some Melrose peppers and enjoy! They are not as thick as regular sweet peppers and when you cook them they don't get mushy and tasteless. They hold the flavor and remain relatively sturdy when cooked. Great for stuffing. I found this tempting recipe online http://www.prouditaliancook.com/2010/08/melrose-peppers-its-chicago-thing.html
I don't want to have to enjoy these merely once a year so I have strung a few dozen of them and hung them to dry for more sauteed peppers in the chilly months ahead!






Ceramic Apple Bowls


Ceramic Apple Bowls

I'm preparing some apple-inspired pieces for a fall wedding. These should be just right for holding caramels.
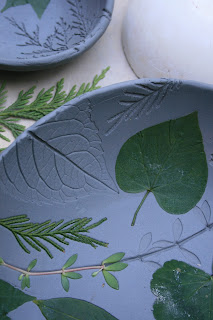
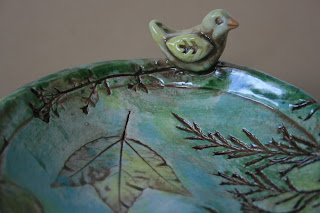
They're about 7 inches wide and slightly curved up along the edge. I rolled my slab about 1/4 thick and used a variety of items to make impressions. Then I cut out the apple shape and slightly raised the edges, using a long twisted rope of paper towelling for support. Once fired I applied dark brown glaze, wiped it off so it remained only in the recesses, and loosely dry-brushed some red and green glaze on top and popped it in the cooker for the final glaze firing.


Wednesday, August 21, 2013

Ceramic Bowl w Nature Impressions

Using Leaves
and other items
to make impressions in clay
 
As an art teacher I look forward to having time to create, play and experiment with new idea's during the summer months. I've been making ceramic pieces with impressions of leaves for several years and wanted to incorporate some 'man made' impressions as well. Mixin' it up was lots of fun and produced some interesting pieces. I also experimented with glaze applications that seemed appropriate for this style. By the time the fun was over there was a whole lotta mess and several finished pieces that will become gifts for friends and family.
I have a lot of variety of leaves in my backyard and selected ones that were hearty and had raised veins. Naturally, thin leaves don't leave much of an impression. Likewise, if the veins were too thick, particularly the center vein, I reduced the thickness by slicing off a portion. I found that if a very deep impression is made the bowl or platter would occasionally crack along the deep impression during firing. I laid the leaves on with the veins against the clay and used a rolling pin to make the impression. Pressing with your fingers will not be effective. I put all the leaves down at once and left them in place after rolling. I cut a circle out AFTER the impressions were made. If you cut the circle out first the force of the impressions will distort the circle and you will have to re-cut it. Once I cut the circle out I removed some of the stiff leaves and placed the circle on top of my bowl mold and gently pressed the clay into shape. The bowl mold was made by pouring plaster of paris into a bowl.
The clay should remain on the bowl mold until stiff, but not dry as it will crack if left on the mold too long. When I worked outside on a hot, sunny day the clay was stiff in one hour. Indoors, at average temperature it took about 3-4 hours.
After bisque-firing the bowl I applied a dark brown glaze, then wiped it off so it remained in the impressions. Then I applied various colors of glaze using brisk, light strokes. Some colors were overlapped. Finally, I applied clear glaze and made sure the entire surface was covered.
Besides using leaves, I also found other items from nature that made wonderful patterns and textures. Shells, a seed pod and an odd little pine cone rolled along the surface added interest. Man-made items that seemed to fit in well with the nature items included lace, buttons and my own stamps made of (fired) clay.


Hydrangea

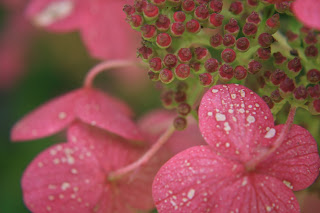
Hydrangea....what can I say about you? A big flower made of little flowers. Never goes out of style. Changes color. Huge, small, short, tall.....I love Hydrangea!