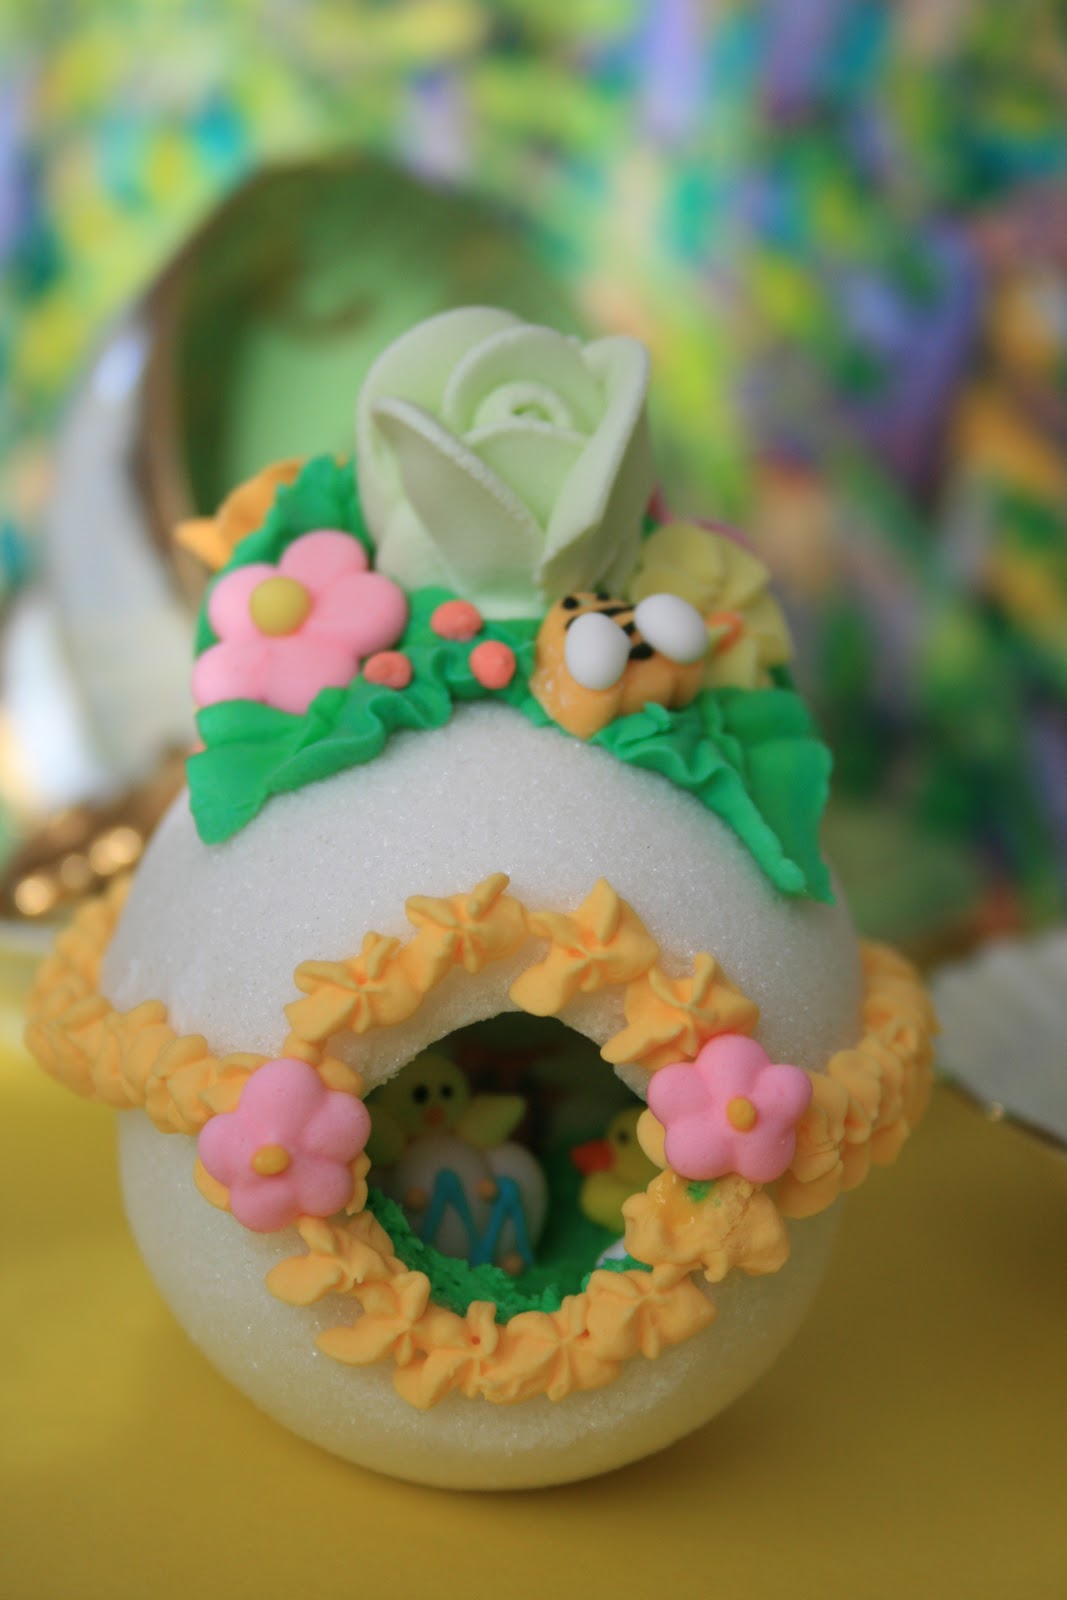
Pages


Thursday, April 18, 2019

Hollow Sugar Easter Eggs HOW TO

EASTER SUGAR EGGS

Instructions Below


Making hollow sugar eggs is almost as much fun as giving them away! It's a fairly simple process that includes mixing granulated sugar with water and meringue powder (dried egg whites). Fresh egg whites can be used instead of Meringue powder, but I have not used that method.


You will press the moist sugar mixture into plastic molds to create each half egg, then hollow them out and attach the two halves together after decorating the interior.  These eggs will last for YEARS! And yes, they are completely edible! Complete instructions are below.


Egg Shell Sugar Mixture
4 1/2 Cups granulated sugar
3 TBLS. Water approx.
1 TBLS. Meringue Powder
(A 10 lb. bag of sugar will make approx. 12 med. size (5"x3.5") eggs)
Mix sugar and meringue powder. Add water by dripping slowly as you mix quickly with your hands until mixture holds together in lumps when you squeeze a handful. If it's too moist it will stick to the mold and have small ruts and dents on the surface due to the sugar melting. If it's too dry it wont stick together. The brand of sugar as well as humidity level will affect the water to sugar ratio. I find the cheapest brand of sugar works best because of its fine grain.

I have purchased the hard, clear plastic egg molds from a cake decorating store. I have also purchased a flimsier, medium sized plastic egg from the dollar store. 
Press the sugar firmly into the plastic sugar molds, especially near the narrow end where you will cut the opening. Scrape the open surface flat with the backside of a butter knife and flip the egg over onto waxed paper. Release mold. At this point, I cut about a 3/4 inch off the front of each half of the egg to prepare for the opening.  I make the cut by slicing down using a thin piece of 1.5" by 2.5" cardboard I've cut from a cereal box. Then I place the small piece of cardboard against the cut edge so the interior wont dry out too much. I also use the tip of a pointed knife or even a toothpick to gently trace a U shaped outline around the edge of the area I will be scooping out of this opening, about 3/8" from outer edge. By doing this, I avoid breaking the delicate edges of the opening when I scoop it out later.
About 2 to 6 hours later, depending on the size of the egg as well as the temperature and humidity level,  the egg halves are dry enough to gently lift, hold securely in cradled palm of hand and carefully scrape out the interior sugar, which is still soft. The exterior is hard. If you do this step too soon, the exterior isn't hard enough and it breaks. If you do it too late, the exterior is very hard and too thick to end up with a dainty egg. Adjust your drying time to allow for the remaining shell to be about 3/8 inch thick. Use the sugar you scoop out to fill more egg molds.  Allow eggs to dry thoroughly after scooping. Drying overnight, or at least for several hours, is advisable.
Once the hollowed egg halves are completely dry you can decorate the  bottom interior with royal icing (recipe below) and purchased decorations or those you make yourself. Put royal icing on the rim of each half to attach them together. Decorate the exterior with royal icing and decorations.

 Royal Icing
2 TBLS. Meringue Powder
3 Cups Powdered Sugar
Approx. 4 TBLS warm water
Mix at low speed for about 10 minutes.


Sunday, March 26, 2017

In the Classroom-Artist Trading Card Project

Students Share Art Their Art With Others

The ARTIST TRADING CARD Project


ATC's are a fun way to get the year started with a small, but meaningful project. It's also a great filler project when you have just a couple of days to work on art. I like to choose a loose theme, such as ' My Community' , then allow students to explore their own interpretation of what that means to them.
We share our ATC's with other classes within our district as well as in other states and countries.
To learn more about ATC's in the classroom visit"
and check out this article in
ARTS and ACTIVITIES magazine for art educators December 2011


The theme of this ATC lesson was to pull two words from a hat and create art depicting those words. This student got BALLOON and TORNADO


 The ceramics students make ATC's...with Clay!

 
 For this project I had ceramic students make an abstract art paper collage first,
then replicate it using clay.


In the Classroom-High School Oil Pastel Project


Pastel Flag Project

My high school students love this project because their drawings are always a success! We use a fail proof,  easy-to-understand process that teaches them how to use accurate drawing and rendering processes. We focus on value to convey depth in the billowing curves of our nations flag. If you would like detailed information about this project check out this article in
ARTS and ACTIVITIES magazine for Art Educators. November 2016


In the Classroom-High School Abstract Art Project

Always a Success!

This fun, easy and educational project begins with students making a collage from magazine pictures.
Next, they create a painting based on their observations of the collage. Students learn so much about composition, problem solving and technique in this project. It's always a good time and every painting is a success because every student advances their skills while having a great time in the art room!


To learn specific details about this project go to this informative article in ARTS and ACTIVITIES magazine for art educators. April 2017 issue.


Monday, December 26, 2016

Vintage Christmas

Blending vintage items with modern décor is like sipping aged wine with a freshly cooked meal. Each lends it's own distinct character while enhancing the other. I've made new pillows from old fabric and photos, repainted furniture to fit my décor and combined wood candlesticks from the 80's with china from the 50's to make colorful serving platters. While I enjoy the fruits of my labors, it is the actual 'making' of the items that provides me with the greatest pleasure.
This Christmas I filled our home with old and new as we look back on the past with fond memories and move forward with dreams of projects yet undiscovered.

MERRY CHRISTMAS!


My home is filled with 'earthy' colors that provide a warm background for the timeless, worn colors of  delicate glass ornaments from Christmas past. What stories these graceful objects would tell...if only they could speak!


 This chunky, hand carved (in North Carolina!) wood bowl with it's rough, uneven edges provides a dramatic contrast with the clean edges of  vintage 50's ornaments. Most of these were probably made in Poland, Germany or the good 'ol USA!

 
I like to sprinkle my vintage cards around the house as decorative accents. You'll find them propped up with the teacups in my glass-door cupboards and hanging from a red velvet ribbon draped across a large mirror in the dining room. Gosh, they're swell!


Last summer I found a few rolls of Christmas wrap at a garage sale. It was a lot cheaper than the new stuff and sooooo adorable! Looks like it might be from the 70's.


What else can I say? He's adorable. He holds the candy canes.Vintage 40's or 50's.
 
 
I got this very old (circa turn of the century), VERY heavy (25 lbs.) doll bed at a garage sale for TEN dollars. Repeat...TEN dollars. I painted it pink and made some new bedding. I was quite certain the four year old recipient of this gift was going to be fairly ecstatic when she received it for Christmas. Bingo. Nailed it.
 
 
 And since our little princess bears a striking resemblance to Shirley Temple, I got her the doll from an antique mall. It's not one of the expensive originals, but it is from the 70's. She was in pretty good shape so all I had to do was wash her clothes, hair and a little body scrub and she's just perfect for little hands to cuddle! The last time I looked, Shirley was sharing the bed with four other 'modern' dolls. What a hoot!

 
Lastly, a fond remembrance of a mom who rests in peace this Christmas. Her recipes for meatballs and manicotti has been a tradition for decades and surely will live on, as well as the potential for re-discovering some lost 'secret recipes' stored in her well-worn recipe file.


Click Here for the link to Spumoni Cookies!
http://theskillfulbee.blogspot.com/2012/12/christmas-cookies.html
 
To see more vintage holiday décor from a previous post, click here


and now it's time for a

HAPPY NEW YEAR!


Wednesday, September 7, 2016

Autumn

Autumn

A perfect blend of warm and cold, smooth and rough, light and dark, orange and blue.
 
My favorite time of year!


Thursday, July 14, 2016

Tea Quotes- For the love of teacups!


     The teacups' siren's song has lured me countless time into thrift shops, yard sales and antique malls. I heard it first when I was a small child. The dainty porcelain maidens rested neatly behind glass cupboard doors in our formal dining room. My mother, a Polish immigrant, had a collection of about ten mid-century sets which she allowed me to touch and hold but once a year. She would pull them out from the cabinet for their annual washing (a ritual she swore kept the porcelain from becoming too dry and brittle) and gently soak them in a  lukewarm, sudsy bath. It was the 1960's and we lived a half a block from the city of Detroit where racial tensions had reached their peak. The Vietnam war raged on, a new breed of rebellious, long-haired teens were erupting and the sweet innocence of the 50's was fading fast. I didn't know my mom and the neighbor ladies she would share a coffee-clatch with would be the last of the stay-at-home moms. I didn't know that the world was about to change. I only knew those simple little teacups with their cheerful florets, meticulous details, and soft-as-butter colors made me very, very happy.
      I think they made my mother happy as well. She had survived a Nazi war camp, had lost her family in WWII and was living in a foreign country. It would be safe to say the teacups were a bittersweet reminder of the formal, yet secure, years she spent living as a displaced person in a  convent in Austria. She escaped the life as a forced laborer and became a war nurse, trained by the nuns in a Catholic hospital. By day she tended the wounded in a crowded hospital ward. At night she retreated to her 'home' amongst historical religious paintings, marble floors and pillars, gilt adornments and all the simple, yet elegant surroundings that the church and convent had to offer. Fine porcelain was the norm.
     Today, as I gather a cheerful brigade of vintage cups and saucers I am transcended to the place in my mind where those happy, childlike thoughts dwell. I often think about what good use I could possibly have for these tiny bearers of good will and if, indeed, I will ever find a way to share the pleasure they bring to others in need of a moment of simple goodness.


This was probably my favorite set as a child. I love the detail, the colors and the promise of spring it represents. Now I use it like a super model, posing it with flowers and backgrounds that compliment its design.


Somehow, the dishtowel in the background of this photo was spared over the decades. When I found it in my mothers' old linens I immediately recalled it. I've always been fond of blues and purples together and the sweet fruit motifs remain imbedded in my mind as first perceptions of 'art'.


If you would like to purchase high resolution digital images, please send me a message!
 
For more teacup and saucer images go to these pages on my blog